Well, some of us here know how to do this, and since I was asked by someone how to do it, I shall write a guide!
What You Need:
- The Elder Scrolls Construction Set (your 2nd CD that came w/MW)
- A mesh that matches you face’s bone structure
- A forward facing shot of your head
- A good image editing prog (ex: Photoshop or Paintshop)
- SceneImmerse (freeware that let’s you preview the head to see if it lines up with the eyes; link provided, click on the name)
- NIF Texture (freeware to assign texture to meshes w/out MAX; link provided, click on the name)
Basically start with the mesh you chose; open up its original texture and play around with the skin color until it is close to something you want.
Next, cut out your features (eyes, mouth, nose, eyebrows) one by one, and play with the skin color so that they match (also, you may need to resize them a bit). Make sure they are layered so you can move them around to line up with the original mouth and eyes (you might want to tone down the opacity sothat you can see both textures at once; but make sure you bump it back up).
Once you feel that they are lined up, save the texture as either psp or pds (depending on what program you are using) so that you will have a backup with layers. Then for testing, save another copy as a dds or tga (dds takes up less space while tga seems to have better quality, I use dds). Don’t worry about blending yet, it’s a beta. Now, open up the original mesh in NIF Texture and hit browse; find the texture you just saved (not the psp/pds, either the dds or tga) and then save the mesh under a new name.
Now open up SceneImmerse, open up the mesh, and hit play, you will see your “head” start to blink and open and close its mouth; check to see how well things line up. If you are satisfied, then proceed to the next part, if not, go back to photoshop, resize or move stuff around (tip: if you have big eyes like me, you could sample the flesh tone [use the eyedropper tool] and then make an outline of the original eye over your eye and shade in the outer portion (don’t worry, you can use blending to make it look good).
After checking it out in SceneImmerse, if you are satisifed, flatten the image. Now you can use the blur, smudge, dodge and burn tools to blend together the seams and add features, depth and tone to the skin. Next save again (under dds or tga); if you save it under the name of the beta, there is no need to re-open NIF Texture, but if you give it a new name, then you should assign it to the mesh again (you don’t need to worry about your psp/pds anymore, tough you may want to save one right before flattening so you can have a copy to play around with if you ever want to “tweak” it some more).
Open your Morrowind directory (where ever you installed it) and click on datafiles; inside, put your mesh/nif in the folder MESHES and your texture in the folder textures. Now open up the TES and assign it as a head to whichever race you feel you resemble (be wary, Imperials stretch the heads in an odd manner, use Imperial meshes only with Imperial bodies!).
This concludes my guide to putting your face in MW; it is very basic, there are many other things you can do (including customizing the mesh) which require more programs, time, effort, tutorial space…
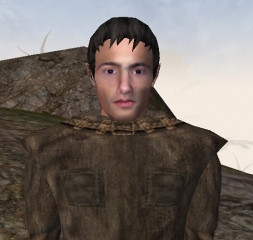
Here’s a recent one I did of me (it was BETA, it has been reworked):
-Many thanks to Cali who supplied the links!
-Many thanks to the creators and distributors of these wonderful freeware tools, which make this job so easy for us!
-Many thanks to Bethsoft for such a great game!
